Layered Rainbow Bath Bomb
Rainbow Bath Bombs are a ton of fun for bath time and easier to make at home than you might think! Check out this fun tutorial for a DIY Rainbow Bath Bomb that is a sweet treat for your skin.
Equipment
- Stainless steel bath bomb molds
- Spray bottle filled with rubbing alcohol
- 1 large mixing bowl
- 6 small mixing bowls
Ingredients
- 2 cups baking soda
- 1 cup citric acid
- 1/4 cup cornstarch
- 1/4 cup dead sea salts
- 1/3 cup coconut oil
- 1 teaspoon polysorbate 80
- 1 tablespoon Shea butter
- 6 teaspoons of rain scented oil
- Red Orange, Yellow, Green, Blue and Purple colorant (I get mine from this set on Amazon)
- 1 teaspoon Red Orange, Yellow, Green, Blue and Purple cosmetic glitter
Instructions
- In a large mixing bowl, add the baking soda, citric acid, dead sea salts and cornstarch. Whisk dry ingredients together.
- Add the coconut oil. Coconut oil binds all the ingredients together, so you bath bombs don’t crumble when you touch them!
- Add the polysorbate 8. Polysorbate 8 helps the coconut oil disperse more evenly in your bath water, makes the bath bombs bubbly and prevents the mica from sticking to the side of the tub.
- Add the Shea butter. Shea butter not only binds the bath bombs to make them harder, which means less chance to break and crumble. It also is great for making your skin feel soft and moisturized.
- Add the scented oil. Mix well. You may need to use your hands to break down any lumps and make sure everything is mixed in. The mixture is perfect when it holds together when you press it into your hands and feels like wet sand. Separate the mixture evenly into the 6-small bowls
- Add 1-2 drops of the yellow color to one bowl. Don’t add more than that at a time because it will make the mixture foam up. Mix well. Now mix in the rest of the colors into the other 5 bowls. If the mix is not dark enough add 1-2 more drops of the color, but no more or it will be too wet.
- Mix in the glitters to their coloring matching bowl.
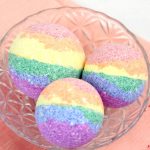
- Layer the red, orange and yellow in one of your bath bombs molds and the purple, blue, and green. Do this until the mixture is slightly overflowing on both sides.
- Press molds together and grind to remove excess mixture. Gently tap each side of the mold to release the bombs. Allow to dry a minimum of 24 hours
Notes
*Yield depends on the size of your molds. For the size shown here we made 3 large bath bombs.